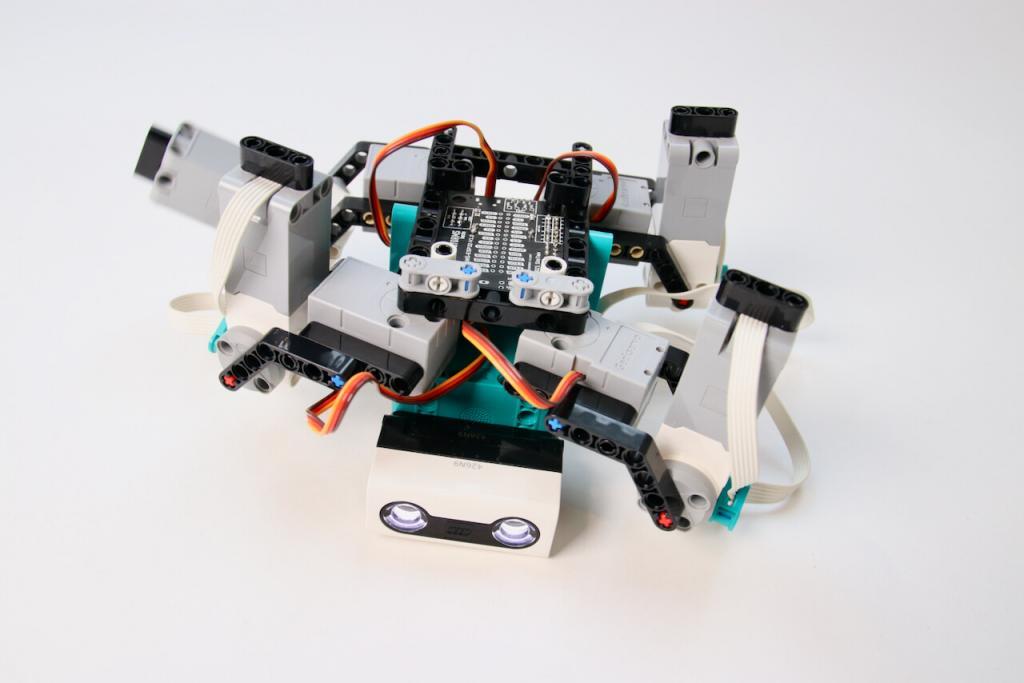
Walking robots have always fascinated me. With LEGO, the limit is usually the number of motors you can add or the weight of all the battery boxes. With Servo Spider, I made a walker that is both light and has eight motors. In this article, you’ll learn how to build the MINDSTORMS Servo Spider, what parts you need, and how the code works.
But first, let’s have a look at how the Servo Spider walks in practice. Here is a short movie about the end result. Note how the legs move forward quickly and backward slowly. Note also the order in which the legs do their up and forward movement.
Collecting the parts for the Servo Spider project
- The basis for the model is a LEGO 51515 MINDSTORMS Robot Inventor kit. That kit has a light controller hub and already provides four motors. In my comparison against EV3, I discussed the advantages of lightweight and compact robot components. In a walking spider like this, that shines.
- For the Servo Spider upper legs, I used four Geekservos. They are light and compact and match the grey on the Robot Inventor motors.
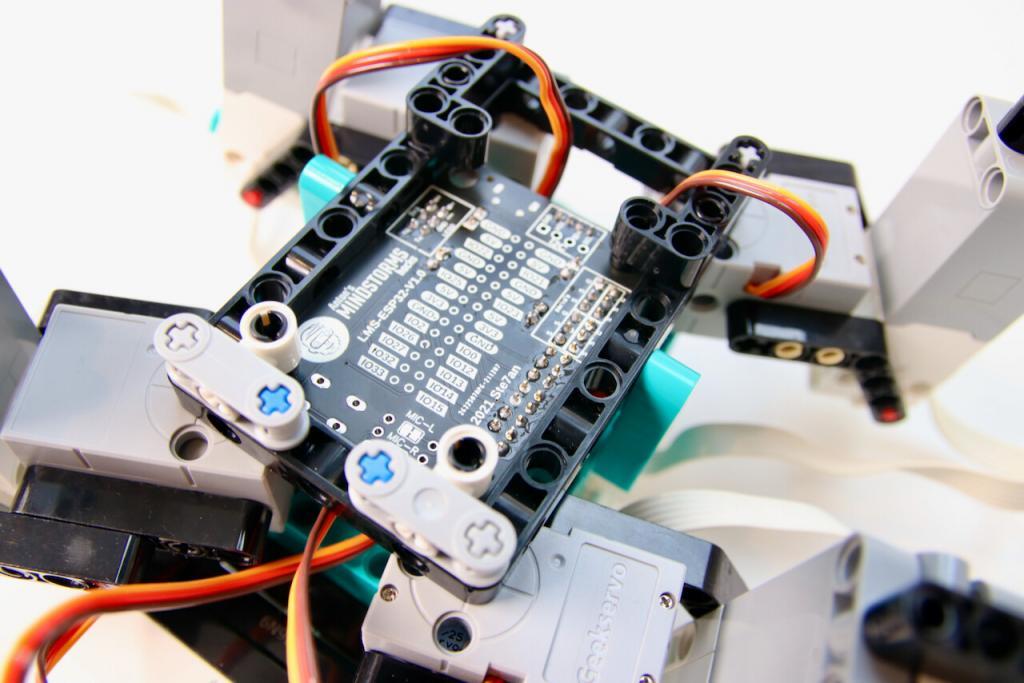
- You can’t plug in hobby servos into the MINDSTORMS hub directly. They require 5 volts and a 2000μs pulse width modulation (PWM) channel. Connecting servos to MINDSTORMS is one of the reasons I built an LMS-ESP32-WIFI board. This board can connect to the MINDSTORMS hub over UART to read servo positions. And it can convert the 8v inside the hub to the 5v needed by the servos.
- The Geekservos are compact, at the cost of some ease of building. Most of the holes on their sides are only half a pin deep, and that’s why you’ll need 12 tan 3/4 pins. Although the MINDSTORMS Robot Inventor set is very complete, it does not include 3/4 pins.
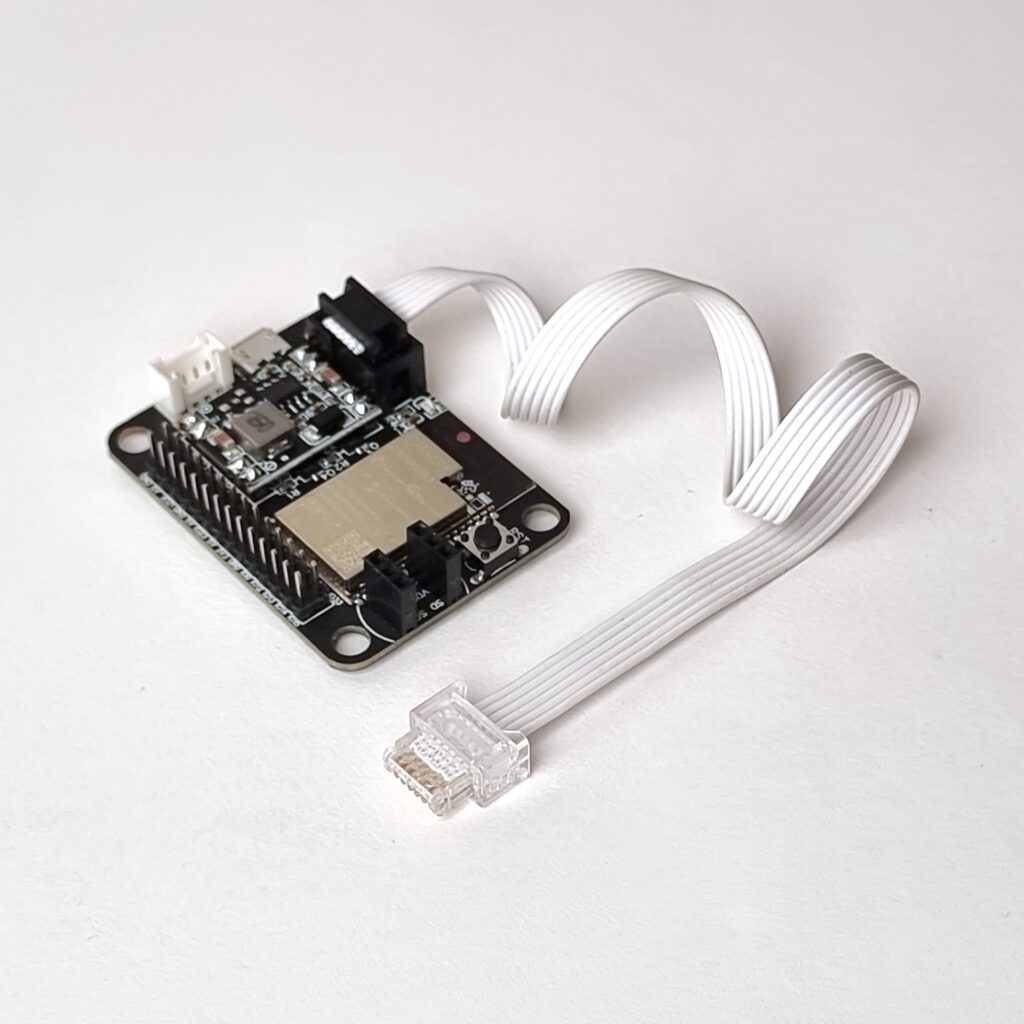
WiFi Python LMS-ESP32 board for MINDSTORMS (LMS-ESP32-v1.0)
This all-new MicroPython expansion board for LEGO MINDSTORMS Robot Inventor, Spike Prime, and EV3. You can easily connect this LMS-ESP32-v1.0 board to your LEGO robot and use it as an interface to a limitless range of third-party electronics. You can now connect any protocol to your LEGO Robot: I2C, UART, SPI, WS2812, Neopixel, I2S, WiFi, Bluetooth Classic, BLE, Bluetooth HID, Hobby Servo PWM, …
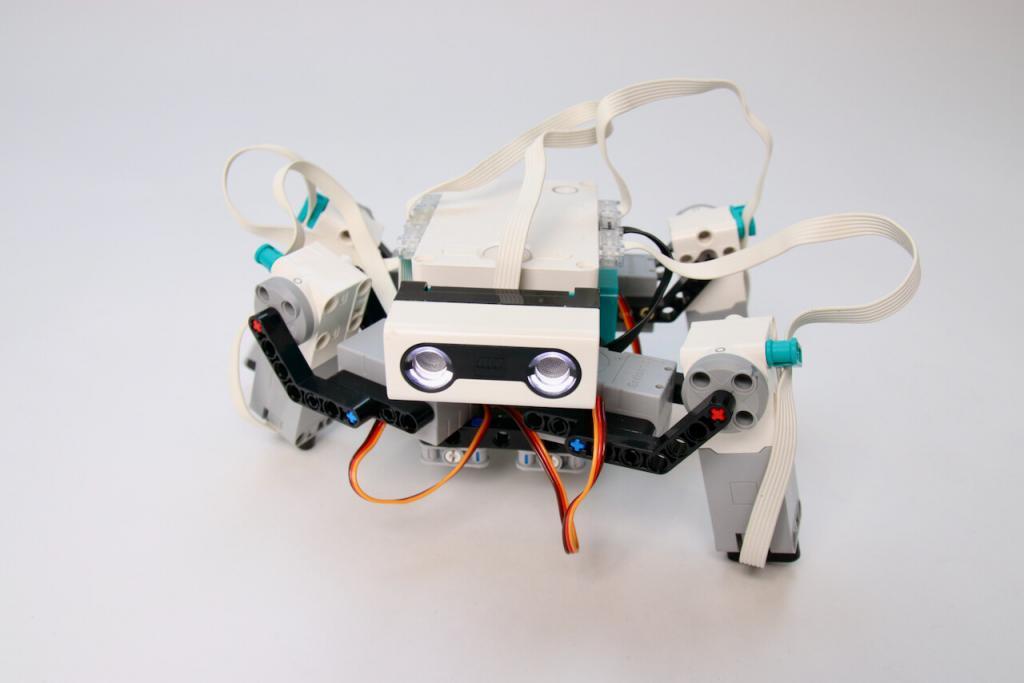
Assembling the MINDSTORMS Servo Spider
An experienced builder can probably assemble the spider based on the pictures below. The model is relatively simple. You plug the motors and servos in their respective corners on the hub.
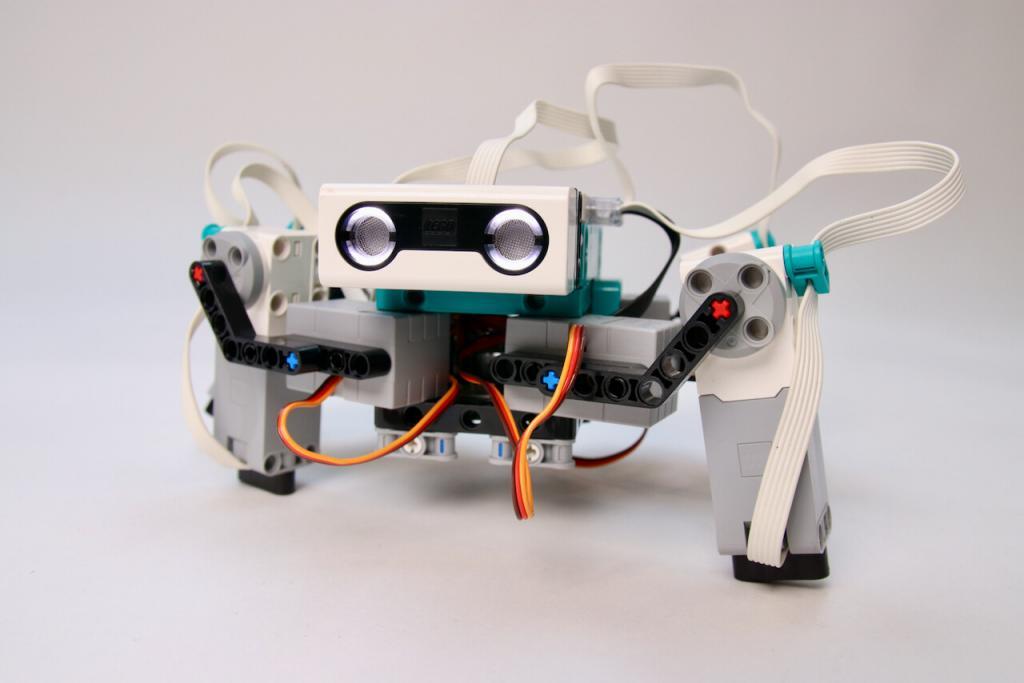
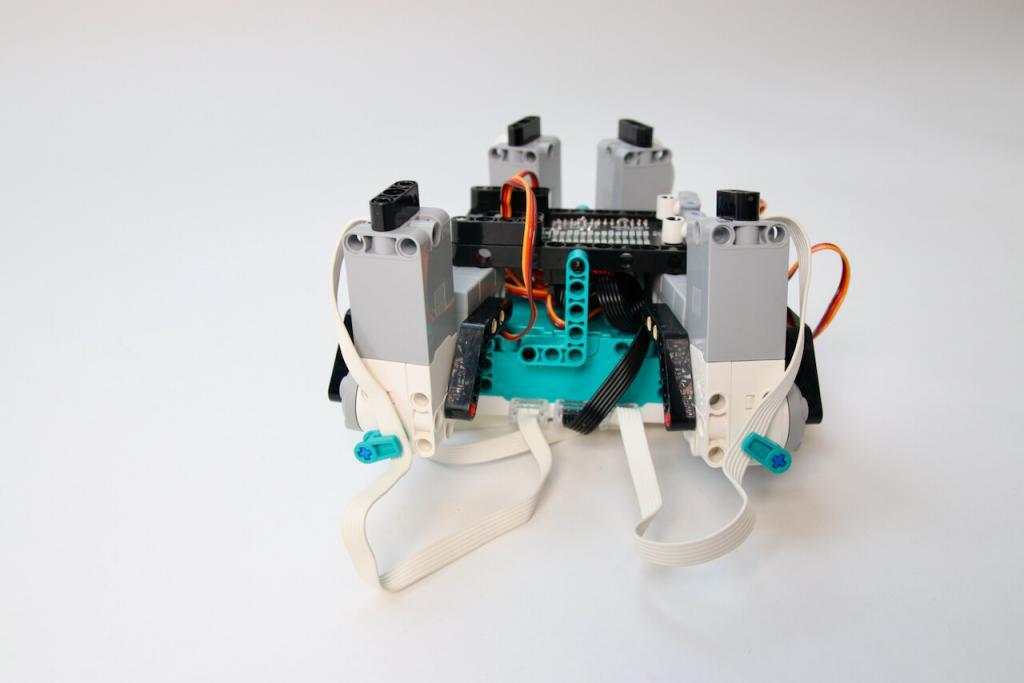
The geek servos have one difficulty: it is impossible to see their neutral position until you power them up. They should come out of the package in their neutral positions. So try to avoid changing their positions and make them stick straight out. If you change the positions accidentally, you will have to re-position them when first running the code.
Not that in my build, I flipped the servos upside down on the left side of the build! Look carefully where the tiny screws are. I flipped them because I want a positive angular position to be forward, regardless of the servo position.
If you want instructions, you can find them on my Patreon site. The instructions are a Patreon exclusive and not for sale on this website.
Programming the Servo Spider to walk straight
There are four challenges to making the spider walk.
- Synchronizing all motors to move so that the spider advances and doesn’t topple over while lifting too many legs.
- Communicating with the LMS-ESP32 board over UART to set servo positions.
- Organize the code in a tight control loop to make the movement smooth.
- Powering and positioning the servos in the WIFI-ESP32 board.
In the past, I have created a lot of code and reusable Python Classes for precisely this situation. To make things easy for you and myself, I have collected all of these classes in an installable library: mpy-robot-tools.
To download it to your MINDSTORMS hub, run the installer script once. Just paste inside an empty python project in the official LEGO app. After that, the classes will be available to you until you run a firmware update.
Synchronizing the spider legs: importing the classes.
To make the legs move in sync, we will be using three Classes: Mechanism, AMHTimer, and PBMotor.
PBMotor is a wrapper around the MINDSTORMS motor classes. I called it PBMotor because it follows the Pybricks nomenclature and motor behavior. That behavior is universal and well-built. On the other hand, the LEGO terminology is all over the place: it is different on Robot Inventor, Spike Prime, and on the REPL.
Instancing a motor with PBMotor is simple: motor_a = PBMotor('A'). This will also reset the relative encoder to the absolute zero. If you don’t pass it a port name, PBMotor will create a stub for you: servo_stub = PBMotor('servo'). This is handy for our servos because you can set and read angles, but it doesn’t change any voltages on the hub. The stub is also handy for testing purposes.
frll = PBMotor('E') # f.ront r.ight l.ower l.eg
frs = PBMotor('stub')
flll = PBMotor('F') # inverted direction
fls = PBMotor('stub')
brll = PBMotor('A') # inverted direction
brs = PBMotor('stub')
blll = PBMotor('B')
bls = PBMotor('stub')

# Put all motors in a list too:
motors = [
    frs,
    frll,
    bls,
    blll,
    fls,
    flll,
    brs,
    brll,
]
The Mechanism() class calculates all motor angles and drives the motors. To calculate the angles, the Mechanism needs a timer: AMHTimer(). AMHTimer generates 1000 ticks per second by default. But it is more powerful than that: you can change the rate and acceleration of time. One practical application is that you can ‘advance time’ to move the robot forward and the ‘reverse time’ to make the robot go backward.
Defining the leg keyframes for the MINDSTORMS Servo Spider
The spider only has two animations: moving a leg forward and backward, and lifting a leg. We can create the entire walking cycle by flipping these animations around and offsetting them for the different legs. I choose to have a base cycle of 2500ms. In that cycle, the leg is on the ground for 2000ms and in the air for 500ms. While on the ground, it pushes the spider forward slowly. In the air, the leg quickly returns to its forward position. I defined the motions for upper and lower legs as below:
servo_keyframes = [
    (0, -30), # Forward
    (2000, 30), # Slowly move backward
    (2500, -30), # Return forward quickly
]

lower_leg_keyframes = [
    (0, -40), # On the ground
    (2000, -40),
    (2250, -90), # Through the air
    (2500, -40) # Back on the ground
]
Once we have the keyframes for one leg, we can flip and offset them for the other legs, using the keyword arguments in linerar_interpolation:
funcs = [
    linear_interpolation(servo_keyframes, smoothing=1),
    linear_interpolation(lower_leg_keyframes, smoothing=1),
    linear_interpolation(servo_keyframes, smoothing=1, time_offset=625), # 625 = 2500 / 4. Four legs.
    linear_interpolation(lower_leg_keyframes, smoothing=1, time_offset=625),
    linear_interpolation(servo_keyframes, smoothing=1, time_offset=2*625),
    linear_interpolation(lower_leg_keyframes, smoothing=1, time_offset=2*625,scale=-1),
    linear_interpolation(servo_keyframes, smoothing=1, time_offset=3*625),
    linear_interpolation(lower_leg_keyframes, smoothing=1, time_offset=3*625,scale=-1),
]
Finally, we can start the timer and the control loop to calculate all interpolated motor positions:
m = Mechanism(motors, funcs)

t = AMHTimer()
while 1:
    m.update_motor_pwms(t.time)
But there is a catch. We still need to tell the LMS-ESP32 board to set servo positions.
Uartremote: the symmetrical form of UART communication between embedded systems
It drove me crazy to program handshakes and message acknowledgments over serial communication time and again. That’s why I created a library with Ste7an to standardize it once and for all.
The simplest way to deploy that library is to create a listener and a caller. In the case of the spider, I made the LMS-ESP32 board the listener. The listener registers a command, set_angles, and starts a listening loop. I put a class around the set_angles method so this script will remember the Servo() instantiations, and also make new instances when necessary.
# This code goes inside main.py on the LMS-ESP32 board.

from mpy_robot_tools.uartremote import *
from mpy_robot_tools.servo import Servo
from machine import Pin

class Servos():
    servos = {
        21: Servo(21),
        22: Servo(22),
        23: Servo(23),
        25: Servo(25),
    }

    def set_angles(self, angles:dict):
        for pin, angle in angles.items():
            if pin not in self.servos:
                self.servos[pin] = Servo(pin)
            self.servos[pin].angle(angle)

s = Servos()

ur = UartRemote()
ur.add_command(s.set_angles, format="repr", name="set_angles")

ur.loop()
The caller just calls the listener with the command name and a parameter. In this case, I chose to use a dictionary as the parameter. The dictionary contains the servo pins and the required angles. So now, all we have to do is add this line of code inside the main control loop on the LEGO side.
# Set up an instance of Uartremote on port D
ur=UartRemote('D')

# Supply 8V for the Servos. The LMS-ESP board will convert it 5V
port.D.pwm(100)

# Constants for the pin numbers where I connected the servos
FRS=23 # Front Right Servo
FLS=25 # Front Left Servo
BLS=22 # etc..
BRS=21

t = AMHTimer()
while 1:
    m.update_motor_pwms(t.time)
    # Now pass a dictionary with all pins and the requested angles for the LMS-ESP32 board to process.
    ur.call('set_angles', 'repr', {FRS:frs.angle(), FLS:fls.angle(), BRS:brs.angle(), BLS:bls.angle()})
Note that mpy-robot-tools works on both the LMS-ESP32 board and the MINDSTORMS hub. In this case, I made a simple Servo() class that converts angles to hobby servo PWM.
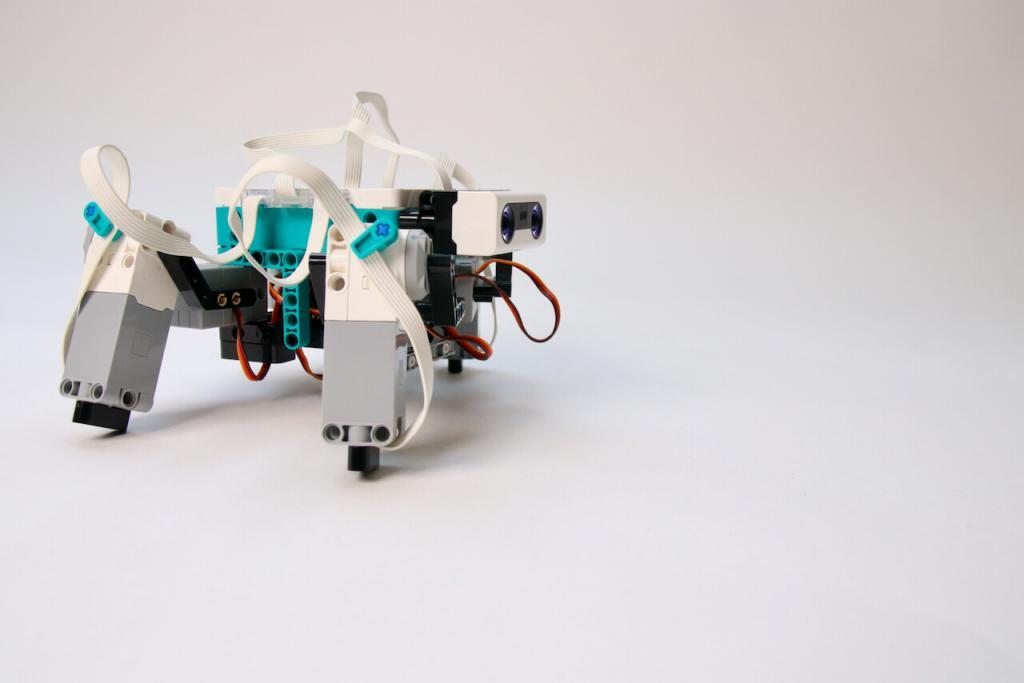
The final result: a walking MINDSTORMS Servo Spider
Thanks to the underlying classes, I’m happy that the main program is abstract and easy to read. You can now easily play around with timing and motor angles.
from projects.mpy_robot_tools.uartremote import *
from projects.mpy_robot_tools.motor_sync import Mechanism, linear_interpolation, AMHTimer
from projects.mpy_robot_tools.helpers import PBMotor
from hub import port
from utime import sleep_ms


ur=UartRemote('D')
port.D.pwm(100)

FRS=23 # Front Right Servo
FLS=25 # Front Left Servo
BLS=22 # etc..
BRS=21

servo_keyframes = [
    (0, -30),
    (2000, 30),
    (2500, -30),
]

lower_leg_keyframes = [
    (0, -40),
    (2000, -40),
    (2250, -90),
    (2500, -40)
]


frll = PBMotor('E') # f.ront r.ight l.ower l.eg
frs = PBMotor('stub')
flll = PBMotor('F') # inverted direction
fls = PBMotor('stub')
brll = PBMotor('A') # inverted direction
brs = PBMotor('stub')
blll = PBMotor('B')
bls = PBMotor('stub')

motors = [
    frs,
    frll,
    bls,
    blll,
    fls,
    flll,
    brs,
    brll,
]

funcs = [
    linear_interpolation(servo_keyframes, smoothing=1),
    linear_interpolation(lower_leg_keyframes, smoothing=1),
    linear_interpolation(servo_keyframes, smoothing=1, time_offset=625),
    linear_interpolation(lower_leg_keyframes, smoothing=1, time_offset=625),
    linear_interpolation(servo_keyframes, smoothing=1, time_offset=2*625),
    linear_interpolation(lower_leg_keyframes, smoothing=1, time_offset=2*625,scale=-1),
    linear_interpolation(servo_keyframes, smoothing=1, time_offset=3*625),
    linear_interpolation(lower_leg_keyframes, smoothing=1, time_offset=3*625,scale=-1),
]

m = Mechanism(motors, funcs)

t = AMHTimer()
while 1:
    m.update_motor_pwms(t.time)
    ur.call('set_angles', 'repr', {FRS:frs.angle(), FLS:fls.angle(), BRS:brs.angle(), BLS:bls.angle()})
Next steps for the MINDSTORMS Servo Spider
My next challenge is to make the spider turn and walk backward, and I would like it to handle rougher terrain. To build this, I will employ the Bluetooth remote control classes in the mpy-robot-tools. Be sure to subscribe to my YouTube channel and follow my Facebook page if you’re interested in the follow-up.
Do you enjoy mpy-robot-tools? Help more people enjoy it!
I test and expand the library all the time. But I think the project would become even better if you could help document it. This way more people can enjoy it. And maybe you can add some more tools to the library. So please fork and make pull requests!


Hello Anton:
This very cool stuff you are doing. I have your ESP32 board and the 4 servo motors so I am now ready to experiment with the ESP32 board and start building the spider robot. I have been looking at a bunch of tutorials on connecting the ESP32 to my WiFi for programming. I have also been looking at your sample python code. I am interested in the use of the microphone to do voice commands. How many words does the ESP32 board understand and can I change what those words are? If so, how do I do that? A tutorial would be very much appreciated. What I would need is how to use the voice command to control the servo motors that are connected to the ESP32 board and the motors connected to the LEGO brick. I will document what I learn and see if any of it would be suitable for documentation.
Mike,
We’re working on a tutorial. In the meantime, look here: https://www.survivingwithandroid.com/esp32-tensorflow-micro-speech-i2s-external-microphone/
I was able to install your mpy-robot-tools/Installer/install_mpy_robot_tools.py onto my Robot inventor brick. I received the reset hub message. Which I understood to mean restart the hub. I then ran your voice control python code. I get this error message ImportError no module named projects.uartremote the first line is — from projects.uartremote import *
What am I doing wrong?
It seems like the installation hasn’t worked. Maybe run the installer script again and restart your brick again? Be sure to disconnect from USB when you restart it. Any LEGO firmware update will erase the installed libraries.
I also saw a problem: the correct import is: ‘from projects.mpy_robot_tools.uartremote import *’
Adding the .mpy_robot_tools fixed the error message. Now to figure out how to get the voice command to work. I will try some of the some of the other examples. Thank you for your help.
Feel free to ask anything!
Adding the mpy_robot_tools fix the import error. I was then able to remove the Mechanism, linear_interpolation, and AMTimer code pieces from your pervious code version for Gelo. Unfortunately, I had to take Gelo apart but when I attached 4 motors they all worked. I will rebuild Gelo in a couple of weeks and test this new version. I built your spider as best as I could from your pictures. The four Lego motors work but not the four servo motors. From one of your pictures it looks like the brown wire goes on the grind, orange on 5v, and yellow on the number 1021. I assumed that the front right leg was on my left when looking at the ultrasonic sensor.
Is there some simple code that I can use that I can move the servo motors and test them?
I’ll add more pictures. You are right about the colors. If the servos don’t move, it might be that they don’t get 5V. Check your buck V converter. Does it get 8V input? Does it deliver 5V output? Some bucks are adjustable so you might have to turn the little screw.
One other thought….. Does it matter whether I run the code on a Spike Prime or Robot Inventor firmware?
It shouldn’t matter, but I haven’t tested everything.
I needed to re-install the Spike firmware onto my Spike hub. When if install the mpy tools I get this message without the usual list of modules being created.
[17:31:21.039] > writing uartremote.mpy to folder /projects[17:31:21.433] > Finished writing uartremote.mpy.[17:31:21.509] > Checking hash.[17:31:21.630] > Hash generated: ccd6ded68ef70594b9c8100d69c3f09e4eff80fefc400633a1aeb94965568c12[17:31:21.702] > Uartremote library written succesfully. Resetting….
Then when I try running my Gelo program looking for the myp tools I get this error message.
[17:33:46.760] > Traceback (most recent call last): File “programrunner/init.py”, line 1, in start_program File “init.mpy”, line 13ImportError: no module named ‘projects.mpy_robot_tools’
This is strange. I don’t think you’re using the latest version of the installer. Because the latest asks you to reset your hub, it doesn’t do so by itself. Get it here: https://github.com/antonvh/mpy-robot-tools/blob/master/Installer/install_mpy_robot_tools.py
Thank you! This version installed just fine. I tried to find where I got the other version but it appears not to be available.
On a different note I tried to webrepl to the ESP32. I get the WiFi connection to work but when I try to login to the ESP32 the password does not work. I tried both IP addresses. Also, once I get connected to the ESP32 can I see what the voltage is being supplied to the motors? If so, what command do I use? Or, do I have to connect a volt meter to the motor connections?
There is no pw. Just press enter!
I received my ESP32 Development kit and have been working my way through the various projects. After doing a few of them I thought, “Can I do some of these projects using your LMS_ESP32 board?” While I was reviewing the notes on the spider project to see how to do that I noted the line at the top of one of the code boxes that says the code needed to be added to the main.py program on the LMS_ESP32 board. This would explain why I have servo motor troubles. I have been using Thonny to program the ESP32 development board. When I try to do the same with the LMS_ESP32 board. I get the com port (com6) from device manager and add that to Thonny setup. When I connect to the LMS_ESP32 board Thonny tells me that the board is busy or does not respond. I use the Stop/Start button on Thonny, but that does not fix the issue. I also tried using the reset button on the LSM_ESP32 board, but, again that does not fix the issue. I did notice that in the device manager the LMS_ESP32 board’s port is listed as USB-SERIAL CH340 (com6) while the ESP32 development board is listed as Silicon Labs CP210x USB to UART Bridge (com11) How am I to access/open the main.py program file on the LSM_ESP32 board? IS there a different method than Thonny? When I do manage to get access where do add the spider servo code in the main.py program?
Stefan’s instructions enabled me to reestablish communication through Thonny to the LSM-ESP32. I then rebuilt your Spider. There was no main.py file on the LSM-ESP32 so I create one and put your code listed above in it and saved it to the LSM-ESP32. How does this file get started on the LSM-ESP32? I also added to the LSM-ESP32 uartremote.py and servo.py files. The spider does not work. The servo motors do not do anything. The Lego motors barely move. What am I still missing?
PS — When I forced the Spike hub to shutdown the servo motors started moving? Is this an indication that the LSM-ESP32 is capable of delivering the required voltage to the servo motors?
I think I have setup everything correctly???? I put the above Lego code under final result on the Spike Prime and the above LMS_ESP32 code in a program file called main.py, which I call from the boot.py file with import main.py I also had to add the servo.py program to the root of the LMS-ESP32. I think I now need to figure out what the initial position of the Lego motors at when I build the LEgo Spider. How do I find out what the initial position of the servo motors need to be? I asked this question on your MatterMost server.
Getting closer to having a walking Lego spider.
Thanks — Mike
PS – I can pay for building instructions. If so How much?
Mike,
I’ll get back to you on mattermost. Fixing some server issues there.
Building instructions are here! https://www.antonsmindstorms.com/product/servo-spider-pdf-building-instructions/