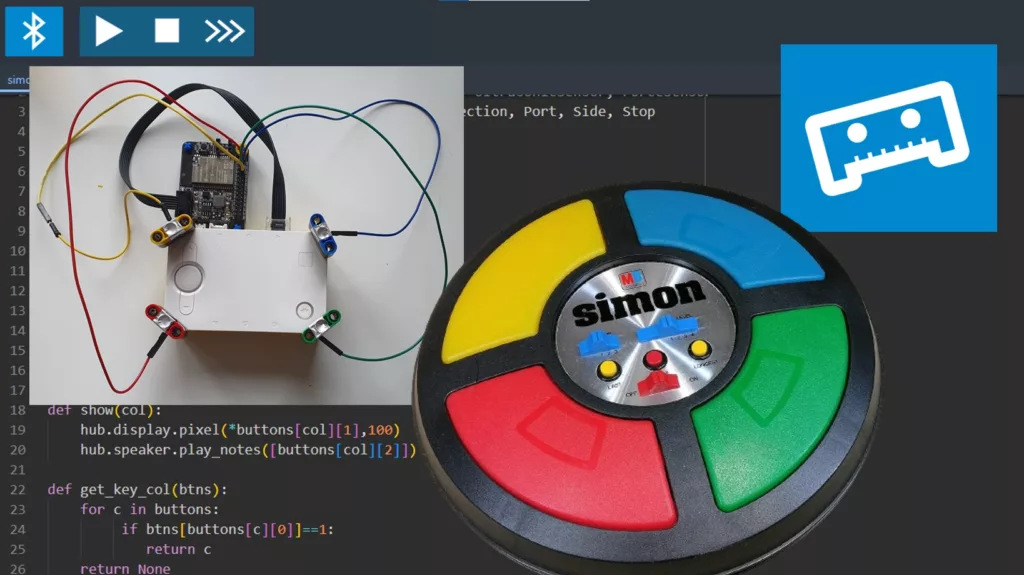
Did you know that the LMS-ESP32 board features up to ten touch inputs? These inputs utilize capacitive touch sensors capable of detecting variations in electrical charge, such as those induced by human skin contact. This means they can sense when someone touches the pins with a finger. This article will show you how to build a “Simon Says” game using these touch sensors.
Before we go into the details of building and programming a Simon Says memory game with LEGO SPIKE Prime, here’s a video of the end result. We show a SPIKE Prime hub, but you can also use the teal LEGO MINDSTORMS Robot Inventor hub. It is nearly identical.
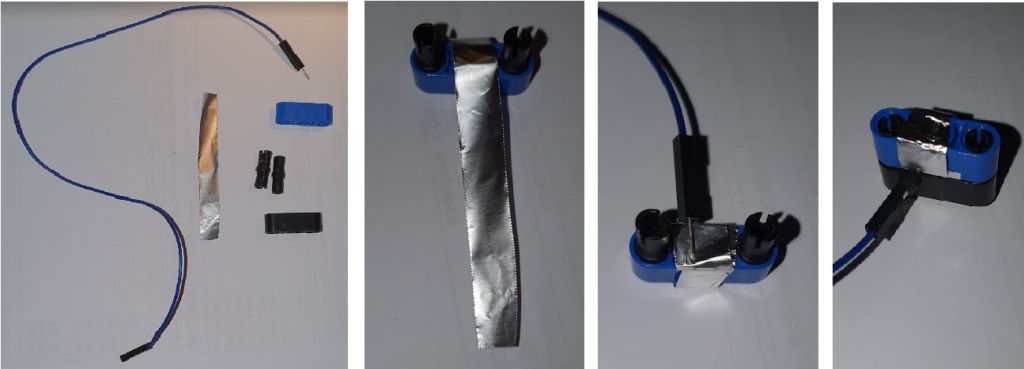
Crafting a tin foil LEGO touch sensor
- Cut a strip of aluminum foil approximately 1cm wide and 5cm long to create a touch button. Next, wrap it around a 3M LEGO Technic beam.
- Attach a male pin from a female/male DuPont jumper wire between the foil and another 3-beam connected with two pins to the foil-wrapped beam. Ensure one side can “click,” leaving some space on the other side for the DuPont pin.
- Repeat this process for yellow, green, and red colors.
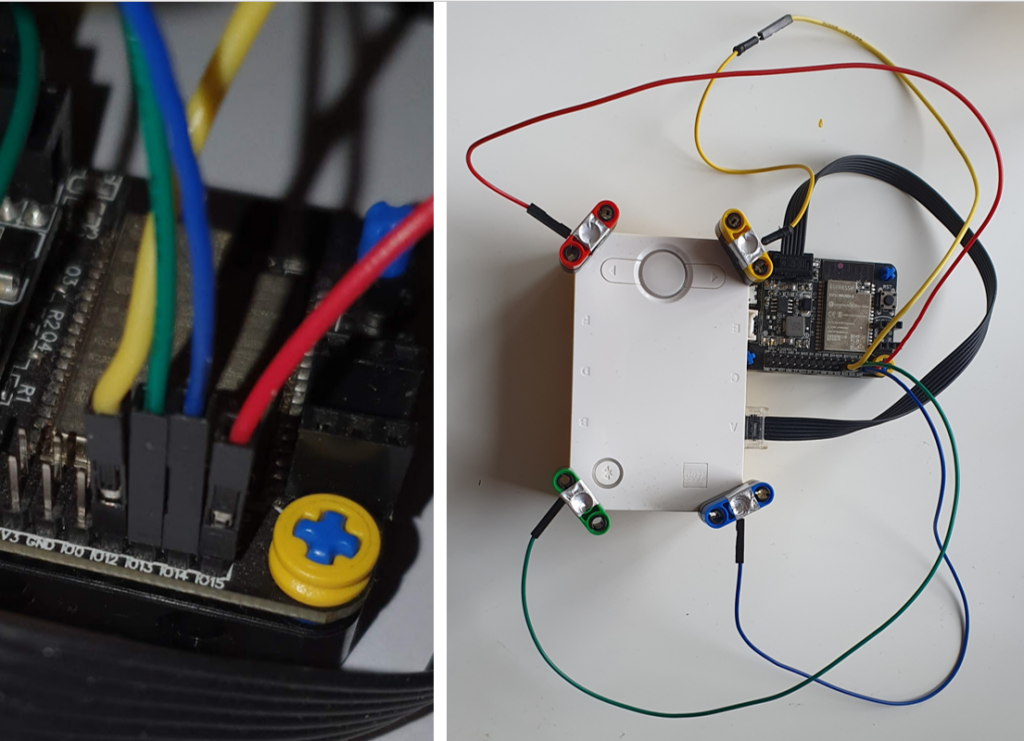
- Connect the female side of the DuPont cables to GPIO ports 12 (yellow), 13 (green), 14 (blue), and 15 (red), and attach the foil sensors to the four corners of your Spike PRIME hub.
Program the LMS-ESP32 to read the tin foil touch sensors
- Flash your LMS-ESP with the ‘MicroPython v1.20 with ioty+ulab+lvgl 9.0+uartremote+pupremote’ firmware available on our online firmware installer. This firmware comes with PUPRemote and LPF2 preinstalled.
- Upload the simon_esp32.py to your LMS-ESP32 board. Rename it to “main.py”, so it starts automatically on boot. You can use Thonny to do that.
Program the Spike PRIME using PyBricks
- Upload the PUPRemote library into your PyBricks environment. To do so, follow Step 3 in our tutorial about connecting gamepads and neopixels.
- Import the program
simon_pybricks.py.
Start playing Simon Says on your SPIKE Prime or Robot Inventor hub
When you start the PyBricks program, the pixel next to the green touch sensor blinks. By touching the green button, a new game is started. Wait for a new sequence to finish and try to reproduce this exact sequence. Once you fail to reproduce, you will hear the fail tune, and the level you reached is shown. The tens are shown as 4 pixels in the corners, and the ones by a single pixel near the blue button.
How do the programs work?
LMS-ESP32
The touch pins can easily be read with the following code snippet:
from machine import TouchPad, Pin
touch_pins = [TouchPad(Pin(i, mode=Pin.IN)) for i in [0,2,4,12,13,14,15,27,32,33]]
pin = 3
val = touch_pins[pin].read()
The value read from a touch pin is typically 800 when not touched and decreases to 300 or 400 when touched. This level depends on whether the external USB power is connected to the LMS-ESP32. Without USB power, the value tends to be a little higher. So, for a safe threshold, we use the value of 450.
Using the PUPRemote library, we define three functions that can be called from the Lego brick:
p=PUPRemoteSensor(sensor_id=SPIKE_ULTRASONIC)
p.add_command('touch','H')
p.add_command('val','4H')
p.add_command('tresh','H','H')touchreads all touch sensors and returns a single value with a bit representation of the individual touch pins,valreturns the value of the touch sensors on pins 12, 13, 14, and 15,treshallows to change the threshold value.
Now that we have the touch sensors enabled in the LMS-ESP32, we can read them from the PyBricks side using the PUPRemote call:
PyBricks
btns = p.call('touch')In the btns value every touch pin represents a specific bit. So, when, e.g., GPIO12 is touched, the return value would be 2**3 = 8. For the colors in our example, the values are yellow:8, green:16, blue:32, and red: 64.
Troubleshooting Simon Says and tin foil touch sensors
Upload the touch_pybricks.py program to the PyBricks environment. This test program will show which button is pressed and print the touch sensors’ raw values. Furthermore, a pixel next to the pressed button will light up. Notice that the communication is rather slow because our emulated sensor has to switch between two modes (one for reading the buttons, the other for reading the touch values).
['.', 'g', '.', '.']
 559, 363, 570, 516
['.', '.', 'b', '.']
 559, 529, 366, 511
If the buttons do not seem to work, check the lower values of the touch sensor and adjust the threshold in the line:
p.call('tresh',400)This value should be larger than any of the smaller numbers you see in the output. Eventually, you can use that threshold value in your simon_pybricks.py program.
What’s next after building this Simon Says game with touch sensors
Here are some ideas for expanding after you build it.
- Play the game and invite friends to play it, too. What is your high score?
- Customize the game by adding new levels. Can you make it go faster? Is it fun with an extra color? Can you the game keep a score?
- Can you improve the model so that it looks better, more integrated, and more solid?
I’m looking forward to seeing your video and pictures. Be sure to drop us a line on Facebook, Instagram, YouTube, or TikTok.


Is it possible to setup the touch to detect variance in the amount of touch? I was thinking if you either lightly touch one of the contacts or grip the contact between two or more fingers? So far I see no difference. I guess what I could do is measure whether one or more contacts are being touched at the same time. This then presents the problem can I setup more than the 4 touch sensors?
This project worked very well for me!
Hello Michael,
Thank you for your feedback. Off course you can use more than 4 touch contacts. These pins on the LMS-ESP32 can be used as touch contact: [0,2,4,12,13,14,15,27,32,33]. I made a quick program to map the readings of all 10 touch pins to a pixel on the hub’s 5×5 matrix (I actually devide the raw touch value by 4, so that the value fits in a single byte). You should be able to adopt this to your own need.
Here you find the programs for the LMS-ESP32 and the Pybricks.
https://raw.githubusercontent.com/antonvh/PUPRemote/main/examples/touch/show_touch_esp32.py
https://raw.githubusercontent.com/antonvh/PUPRemote/main/examples/touch/show_touch_pybricks.py
Good luck!
Thank you for the ESP32 and Pybricks code. The setup worked for me except for one of the pins does not show a touch. I am using the following pins, 0, 2, 26, 12, 27, 13, 32, 14, 33, 15. It is pin 26 that does not show a touch. It is possible that pin 26 is damaged. I tried changing the ESP32 list by removing pin 4 and adding 26 (in front of pin 27 in the list) but I get an error message. Can I use pins 22, 21, 25, 23? If so how?
Not all the GPIO pins can be used as touch pins. Only GPIO pins 4,0,2,15,13,12,14,27,33,23 correspond to touch 0 until touch 9. So GPIO26 has no touch capabilty. In my example Im read all touch-capable pins. Adding an extra value to this array, will cause the error because I define 10 values to be read using
p.add_command('touch','10B'). Consequently, if you extend the array with one extra value, the loop in the thetouch()function fills one value too much.Pins 26, and 22, 21 and 25 are no touch pins. Thus, you can not use them. Use any pin from the array [0,2,4,12,13,14,15,27,32,33] and you should be fine.
From the labelling on the back of the LMS32 which one is pin 4? From the left side I see GND, 5V, IO22, GND, 5V, IO25, 5V, 3V3, GND, IO2, IO26, IO27, IO32, IO33. From the right side I see GND, 5V, IO21, GND, 5V, IO23, 5V, 3V3, GND, IO0, IO12, IO13, IO14, IO15.
On the top silk screen the gpio number are next to each pin in a small font. Hope this clearifies the numbering.