Remote controlling your robot is fun! Many people buy the LMS-ESP32 expansion board to connect their Bluetooth gamepads to their LEGO. In the past we only supported Python or Pybricks. Starting today, you can use the word blocks in the official LEGO SPIKE Prime 3.0 (SPIKE3) program! This guide walks you through the setup for your first spike word blocks gamepad program.
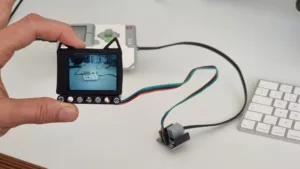
Let’s start with a video demo where we connected a Nintendo Gamepad Pro controller. This demo shows the x and y coordinates as a line plot and the coordinates from both joysticks as a bar graph. In the text box, you see the coordinates from the left and the right joystick, which are from 0 to 255. Notice how fast the numbers update! The connection to the gamepad is very real-time and without lag.
When you look at the list of sensors next to the hub in the green circle, you will notice that our board poses as a Color Sensor. The actual gamepad state is decoded from the raw values in the three colors: red, green, and blue. Now that you’ve seen how to read and display values let’s go over the steps to set the gamepad up with SPIKE Prime.
Step 1: Flash the LMS-ESP32 board to emulate a SPIKE3 color sensor
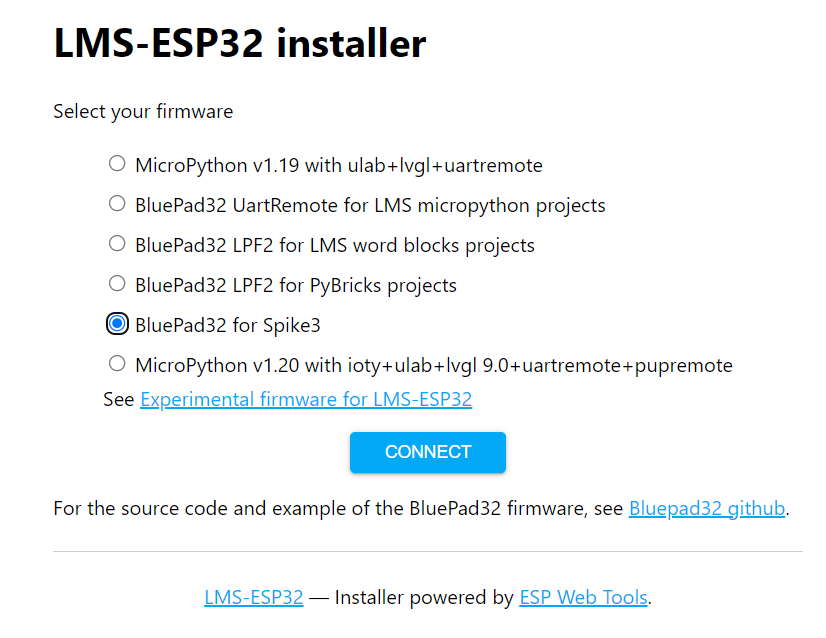
We provide different firmware for the LMS-ESP32. Different firmware can be more practical depending on the development environment for LEGO robots. In this case, we want to emulate SPIKE3 sensors for use in LEGO Scratch or Word Blocks.
- Navigate to our online firmware website.
- Select ‘BluePad32 for Spike3 ‘ from the available options.
- Next, connect your LMS-ESP32 board to your PC through a USB wire.
- Click connect and select the serial port with the LMS-ESP32 board. On my Mac, it’s usually something with
usbmodemin the name. On windows something like COM. - Follow the steps during the firmware flashing process.
Step 2: Download the SPIKE Word Blocks template program for gamepads
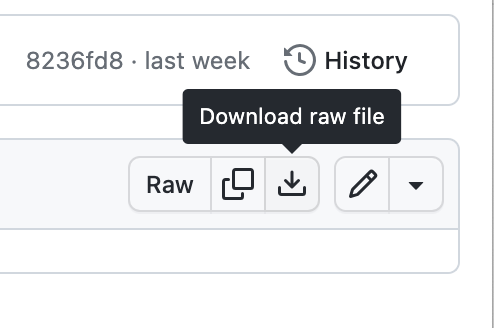
We made a GamePad Word Block program template in our GitHub repository. Go to that website and choose bluepad_spike3_template.llsp3 and click the download raw file button.
Step 3. Connect the gamepad to LMS-ESP32 board
Ensure the LMS-ESP32 is plugged into a SPIKE hub and the hub is powered. A red LED will light up on the LMS-ESP32 board. The board is now ready to pair with your controller. On my Playstation 4 gamepad, I have to hold the share and PS buttons at the same time to pair the gamepad. Ste7an has a dedicated pairing button on his Nintendo Switch gamepad.
Step 4. Open and customize the gamepad word block program in SPIKE3
You will see a program skeleton under the start-hat. It has a forever loop that calls the bluepad myblock. Change the letter here if you connect the LMS-ESP32 to a different port than port B. Just type a single capital letter to refer to the port. You can create a new hat block ‘When the program starts’ for your own program or add blocks to the existing forever loop.
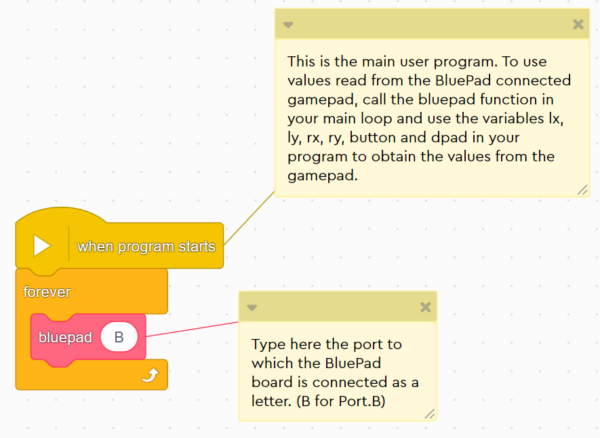
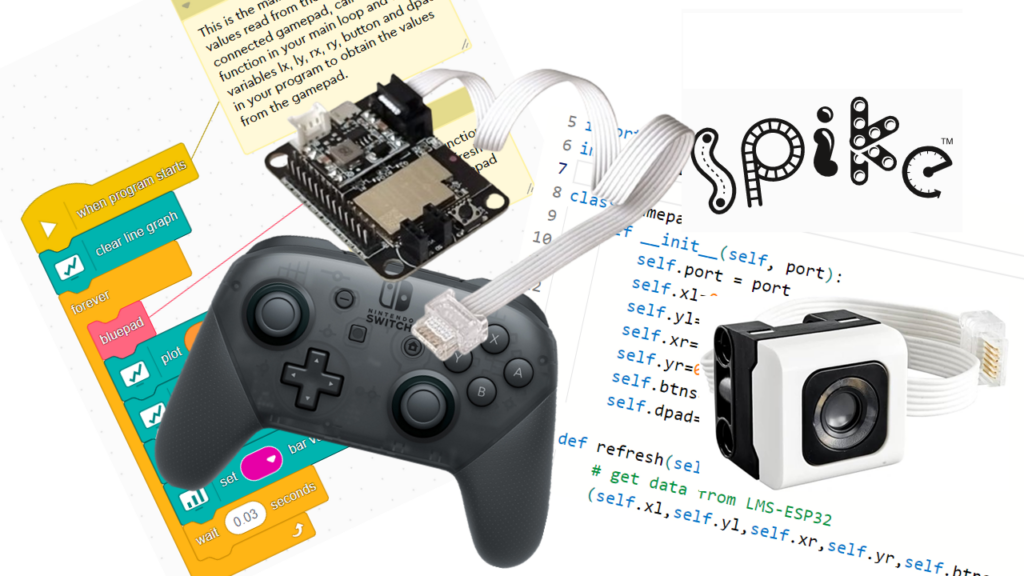
This bluepad myblock reads the gamepad joysticks and buttons. The myblock then updates all gamepad variables in the program.
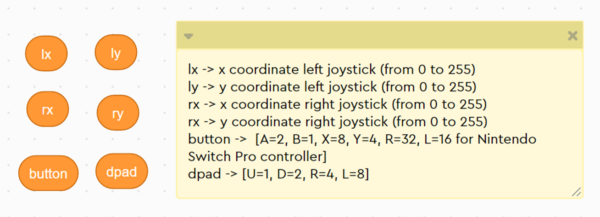
You can now use these variables in your program to read the corresponding gamepad values:
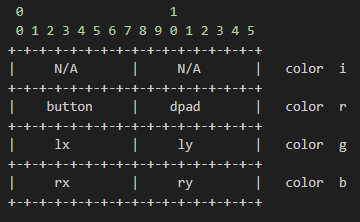
lxandlyare the x and y coordinates of the left joystick from 0 to 255rxandryare the x and y coordinates of the right joystick from 0 to 255buttonkeeps the status of the buttons [A=2, B=1, X=8, Y=4, R=32, L=16 for Nintendo Switch Pro controller]dpadkeeps the status of the arrow keys on your gamepad [U=1, D=2, R=4, L=8]
These values might be different for different controllers. Run the template program and view the variables to see what values your gamepad sends.

Some ideas for spike word blocks gamepad programs you can make
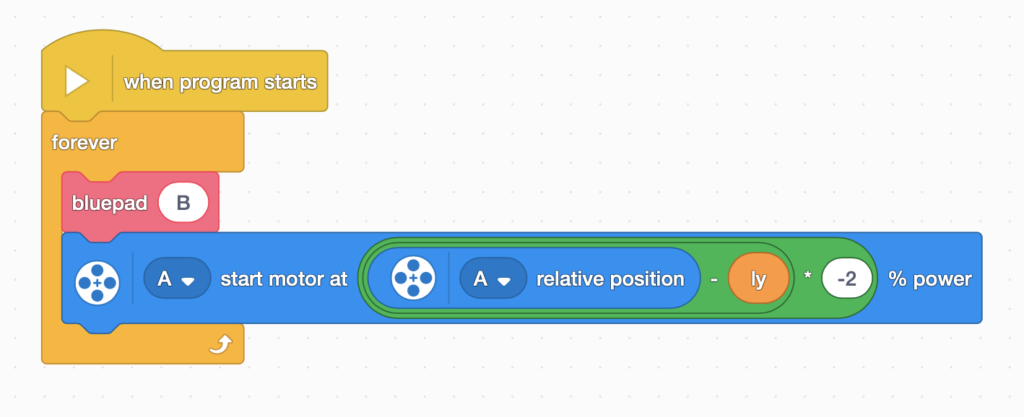
The first program is handy if you have a car and you need to control the steering of the front wheels. The program below ties a gamepad joystick to the wheel position. A LEGO motor is in port A. To find the ‘Start motor at’-block and the ‘relative position’-block, you need to click Extensions in the lower right corner of the SPIKE app. Then select ‘More motors’.
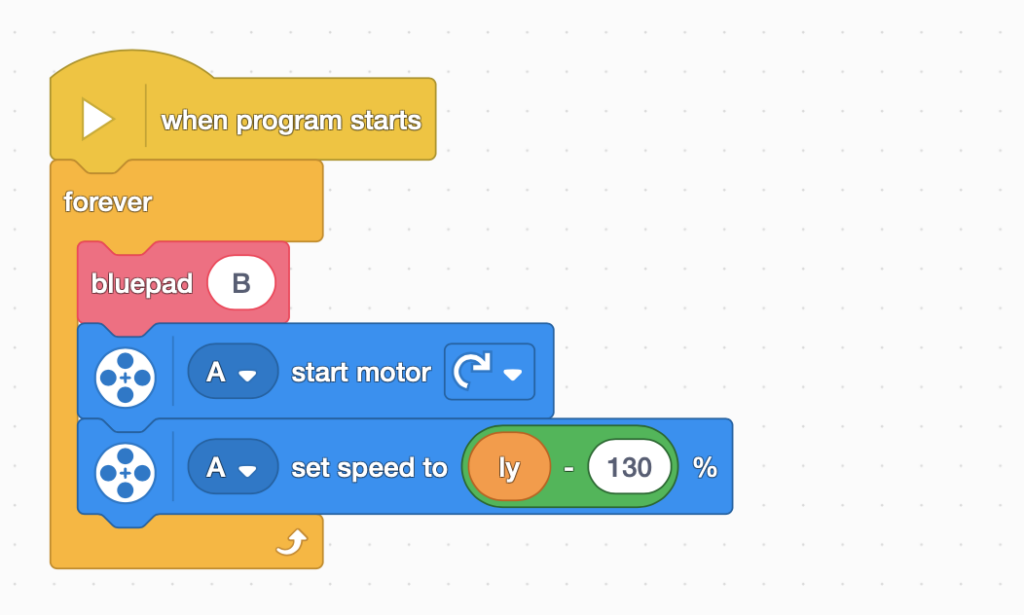
Another way to use the gamepad is to control the speed of a motor. Here is a program that does just that.
You will find more example programs in our GitHub repository. Enjoy building robots. If you want to know more technical details, read on!
The inner workings of the bluepad myblock to extract gamepad data
The firmware on the LMS-ESP32 emulates a Lego Color Sensor. From the perspective of the hub, the LMS-ESP32 is a Lego Color Sensor. Instead of sending real colors, as the original Lego Color sensor does, we wrap the values read from the BluePad firmware in the color values. By doing so, we can use an unmodified Lego Word Block to read data from the connected gamepad. This conversion, from colors to bluepad values, happens in the MyBlock bluepad. You don’t need to understand this to create fun robots. We’re just explaining it in case you’re interested.

As you can see, we read the raw red, green, and blue values of the Color Sensor connected to the indicated port.
Below, you see how the various values read from the gamepad are allocated in the 16-bit fields for the color sensor. We use division and mod operators to get the upper and the lower bytes.
An accurate and responsive way of controlling your Lego Spike 3 robot
You can now directly connect a GamePad (PS3/4 or Nintendo Pro Controller) to your Spike 3 project using the LMS-ESP32 board. This gives you an accurate and responsive way of remotely controlling your Lego Spike 3 robot.
We hope you design new applications for your robot where you use the remote control with a gamepad. Because of the low delay, this is very suitable for use as a remote control of your robot vehicles. Remember to share your work and tag us on your favorite social media channel!