
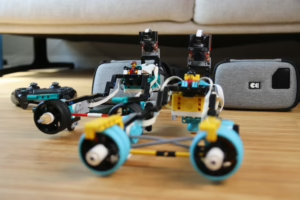
Get ready to merge the worlds of LEGO Technic and gaming for an exhilarating remote-controlled experience! This blog post will walk you through building a remote-controlled car using a PS4 Sixaxis gamepad. Let’s dive right in.
First, take a look at the end result. I start the Technic hub, then start the program by pressing the green button again. For this video, my gamepad was already paired, so the LMS-ESP32 board picked it up right away.
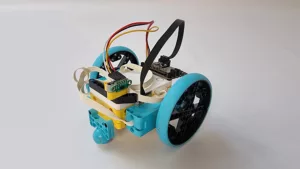
Step 1: Build a Basic Car for remote control with a gamepad
For starters, you’ll want a car to control. If you’re not sure where to begin, why not start with the hot-rod design from my website. It’s a sturdy, versatile car that makes a perfect base for this project. That car has two small angular technic motors and uses a differential for making smooth turns. You can replace the hub with a Large Technic Hub, or just use the MINDSTORMS Robot Inventor hub from the building instructions. Both work fine with this guide!
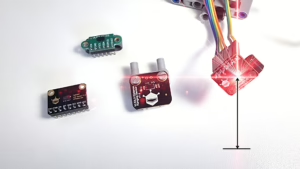
Step 2: Integrate the LMS-ESP32 Board
Get an LMS-ESP32 Board
This board acts as the intermediary between your gamepad and your LEGO Technic Hub. Get your hands on an LMS-ESP32 board through my website. It is soldered and plug-and-play with the included wire. This board gives your LEGO builds the ability to run Python code and interact with other devices and custom electronics.
Flash the ‘BluePad32 LPF2 for PyBricks projects’ firmware on the LMS-ESP32 board
Head over to firmware.antonsmindstorms.com to install this firmware on your LMS-ESP32. If you use Chrome, you can flash the board straight from the browser! The ‘BluePad32 LPF2 for PyBricks‘ firmware makes it compatible with PyBricks and allows it to communicate with your gamepad.
Step 3 Code the Hub to process Gamepad stick and button information
Install PyBricks on the Technic Hub
Navigate to code.pybricks.com to install Pybricks on your Technic Hub. PyBricks allows you to run Python code directly on LEGO Hubs. You can install – and revert to LEGO firmware – in seconds. Just click the gear icon and follow the guide.
Create pupremote.py in PyBricks
Copy the contents of pupremote.py from GitHub and paste them into a new PyBricks program with the name pupremote.py. This script is part of the PUPRemote library that enables remote procedure calls on your LEGO device.
Create hotrod.py in PyBricks
Next, grab the hotrod.py code from GitHub and paste it into another new PyBricks program. This is the code that will control your hot rod. The essential code works like this:
from pupremote import PUPRemoteHub
# Set up an LMS-ESP32 with Bluepad-Pybricks on port D
lmsesp32=PUPRemoteHub(Port.D)
# Add the gamepad command and data structure
lmsesp32.add_command('gmpd',"hhhhHH","HHHHHHHH")
steer = Motor(Port.A)
fwd = Motor(Port.B)
# Helper to translate values
def scale_stick(val, min_val, max_val, deadzone=25):
if -deadzone <= val <= deadzone:
val = 0
return (float(val + 512) / 1024) * (max_val - min_val) + min_val
# Reset steer angle by finding the limit
steer.run_until_stalled(-200, Stop.COAST, 40)
steer.reset_angle(-200)
steer.run_target(300, 0)
while True:
lx, ly, rx, ry, btns, dpad = lmsesp32.call('gmpd')
if -512 <= lx <= 512: # Gamepad is connected if it returns regular values
turn = scale_stick(rx, 100,-100)
spd = scale_stick(ly, 110,-110)
steer.track_target(turn)
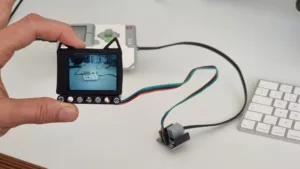
fwd.dc(spd)Step 4: Run the Code to remote control your Technic hub with a gamepad
Once you’ve pasted the code, run the program. You’re now ready for some remote-control action! Hit the play button in Pybricks.
Pairing the Gamepad: Connect the PS4 sixaxis to LMS-ESP32
To connect the gamepad, put it in pairing mode. The LMS-ESP32 board will pick it up and pair. In the case of the PS4 sixaxis gamepad, you put it in pairing mode by first turning it off. Then, turn it on by holding the PS and Share buttons simultaneously. This will pair it with your LMS-ESP32 board.
Have Fun Driving!
Your remote-controlled car is now ready for action! Steer it around using your PS4 Sixaxis gamepad.
About the PUPRemote Micropython library and communication protocol
The PUPRemote library used in this project allows for easy remote procedure calls on pyboards. It’s a powerful tool that opens the door to a plethora of custom electronics projects. The underlying standard is the LEGO® Powerfunction 2.0 (LPF2) communication standard. This standard is also known as LEGO® PoweredUp, LPUP, or PUP. Hence the names PUPRemote and PUPDevice. The protocol is how sensors and motors communicate with most LEGO hubs and battery boxes. You can explore it further on our GitHub repository. Please fork and contribute. Documentation of our PUPRemote library is on docs.antonsmindstorms.com.
More Remote Control Project Ideas for (PS4) gamepads and LEGO Technic Hubs
Why stop at cars? The possibilities are virtually endless. Here are some ideas:
- BattleBot Arena: Create a fleet of LEGO Technic battlebots, each controlled by a PS4 gamepad. Host a battle with friends to see whose robot comes out on top. Use the gamepad to control the bot’s movements, as well as activate weapons like flippers or hammers.
- Technic Crane Operator: Build a LEGO Technic crane with full 360-degree rotation, and a winch to lift and lower objects. Use the PS4 gamepad’s joysticks and buttons to operate the crane, replicating real-life crane operations in miniature.
- Adventure Racing Course: Set up an obstacle course and use the PS4 gamepad to navigate your LEGO Technic car through ramps, tunnels, and tight turns. Incorporate sensors to start and stop a timer, turning it into a race against the clock.
- Mini Golf with Technic Windmills: Build LEGO Technic windmills and other obstacles for a mini-golf course. Control each obstacle’s movement using your PS4 gamepad. Try to time your mini-golf shots while also manipulating the obstacles to make the game challenging.
- Motorized Liebherr: Control the awesome Technic Technic 42100 or 42146 from the comfort of a gamepad instead of an awkward mobile phone.

Each of these projects could be a fun and challenging way to combine the functionality of a Technic Hub with the versatile control options a PS4 gamepad – or any Bluetooth gamepad – offers.
So what are you waiting for? Unleash your creativity and bring your LEGO Technic creations to life with the power of remote control.
Happy building and driving! Please share your creation online and let me know!


Hello Anton:
I managed to get the above setup to work. Response time is amazing! Now I would like to modify the code to include headlights, and sounds. Unfortunately, I do not understand the code well enough to add a button press to turn on or off a set of lights, and or to add a honking sound. How would I add these actions to the existing code?
Mike
You can call the neopixel commands from the hub. https://docs.antonsmindstorms.com/en/latest/Software/PUPRemote/docs/index.html#bluepad.BluePad
You probably need something like this
bp = BluePad(Port.D)

...

left_pad_x,left_pad_y,right_pad_x,right_pad_y,buttons,dpad = bp.gamepad()

if "X" in bp.btns_pressed(btns):

bp.neopixel_set(led_nr, color, write=True)
Hello. I am just a self taught beginer with Python, so I would be more interested in seeing code for use on your mechanum car (which I have already built) as it can better take advantage of the multiple controls on such a gamepad. Thanks!
I should probably add in that I am referring to using PyBrick Python code instead of the Mindstorms block code you used prior with your mechanum car. I simply do not like using the block programming method so always try to learn me some more Python 🙂 I have manage my own basic code to drive for/back/side/diagonal and spin using the LEGO remote, but figuring out the joystick to omni directional control is a bit beyond my current skills 😉
Well… I manage to piece together this, that sorta works. Although it turns out all I managed is really just a tank drive, not utilising proper mecanum control. Back to Google powered brainstorming.
Add pupremote.py in pybricks, with the contents of pupremote_hub.py
to run this.
from pybricks.pupdevices import Motor, ColorSensor, UltrasonicSensor, ForceSensor
from pybricks.parameters import Button, Color, Direction, Port, Side, Stop
from pybricks.robotics import DriveBase
from pybricks.tools import wait, StopWatch
from pupremote import PUPRemoteHub
p=PUPRemoteHub(Port.C)
Mecanum wheel/port orientation:
LeftFront, RightRear, RightFront, LeftRear
motors = [Motor(Port.E), Motor(Port.B), Motor(Port.A), Motor(Port.F)]
p.add_command(‘gmpd’,”hhhhHH”,”HHHHHHHH”)
def scale_stick(val, min_val, max_val, deadzone=25):
if -deadzone <= val <= deadzone:
val = 0
return (float(val + 512) / 1024) * (max_val – min_val) + min_val
while 1:
lx, ly, rx, ry, btns, dpad = p.call(‘gmpd’)
if -512 <= lx <= 512: # Gamepad is connected if it returns regular values# Bottom right is positive
vx = scale_stick(lx, 1000,-1000)
vy = scale_stick(ly, 1000,-1000)
# Mecanum wheel/speed & direction orientation:
# LeftFront, RightRear, RightFront, LeftRear
spd = [vx - vy, vx + vy, vx + vy, vx - vy]
for j in range(4):
t = int(spd[j])
if t > 1000:
t = 1000
if t < -1000:
t = -1000
print(j,t)
motors[j].run(t)
Well… the posted code got messed up, and i can’t edit or delete my comments. Editors… I am done posting comments here, so feel free to fix or delete 🙂
There is simple python code here: https://github.com/antonvh/mpy-robot-tools/blob/master/Example%20projects/bluepad_mecanum_wheels.py
Thank you!
Honestly I never thought of looking in a different repository of yours, as it was for the mpy-robot-tools library (one that I have had trouble installing/using with reliability) and not the PUPRemote.
That said, I think I see what was missing… a strafe option… In this case initiated by a 2nd joystick if I understand correctly. I should be able to trial-and-error my way around the math 😀 and add this into my code.
Thanks again!
Wish I could fix my prior code post, but hopefully this will format properly as it works now for anyone else wanting to use PUPRemote gamepad with mecanum rover. Left stick for directional drive and right stick for spin rotation
# Add pupremote.py in pybricks, with the contents of pupremote_hub.py# to run this.
from pybricks.pupdevices import Motor, ColorSensor, UltrasonicSensor, ForceSensor
from pybricks.parameters import Button, Color, Direction, Port, Side, Stop
from pybricks.robotics import DriveBase
from pybricks.tools import wait, StopWatch
from pupremote import PUPRemoteHub
p=PUPRemoteHub(Port.C)
# Mecanum wheel/port orientation:
# LeftFront, RightRear, RightFront, LeftRear
motors = [Motor(Port.E), Motor(Port.B), Motor(Port.A), Motor(Port.F)]
p.add_command('gmpd',"hhhhHH","HHHHHHHH")
def scale_stick(val, min_val, max_val, deadzone=25):
if -deadzone <= val <= deadzone:
val = 0
return (float(val + 512) / 1024) * (max_val - min_val) + min_val
while 1:
lx, ly, rx, ry, btns, dpad = p.call('gmpd')
if -512 <= lx <= 512: # Gamepad is connected if it returns regular values
# Bottom right is positive
vx = scale_stick(lx, -1000, 1000) #Speed
vy = scale_stick(ly, 1000, -1000) #Steer
vz = scale_stick(rx, -1000, 1000) #Strafe
# Mecanum wheel/speed & direction orientation:
# LeftFront, RightRear, RightFront, LeftRear
spd = [-vx - vy - vz, vx + vy -vz, -vx + vy -vz, vx - vy -vz]
for j in range(4):
t = int(spd[j])
if t > 1000:
t = 1000
if t < -1000:
t = -1000
print(j,t)
motors[j].run(t)
hello,
I can’t seem to connect my Xbox controller to the LMS-ESP32 board, is there something that I do wrong or the Xbox controller is not supported?
Thanks in advance for the support!
Microsoft does not adhere to any open standards, so no. It is not supported.
Odd… I can run my above code with either my PS4 or XBOX controller (not at same time 😛 ) and both connect and work the same.
Thank you for your answer!
If I buy a PS5 controller, I guess it will work fine, no?
Yes. Here is a list of supported controllers: https://github.com/ricardoquesada/bluepad32#supported-controllers
Hello. I’ve just recevied my board but I don’t have a proper cable for connect it to my pc via USB. Where can I find that cable?
Nevermind, I’ve just seen the small usb port on the board jajaja